There are two basic things that you can do with the Local Editor Interface: write a post and add an event. We will walk through each of those operations separately. But first let’s go through some basics about logging in and finding your way around the interface.
Interface components
You access the training/test site by entering http://cccts.net. This will display the user view for the site. Before you can do anything with the local editor interface you need to log in so that the system knows who you are. Go to the bottom of the page to find the following login widget.
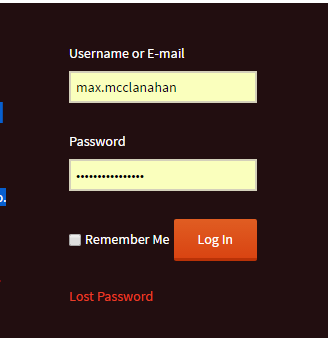
Enter the user name and password you were sent when your account was set up and press the “Login” button.
Note: If you are logging into the production site (rather than the training site) there is currently no visible login widget. To login to your account on the production site use the url https://cccts.org/login/. Once you login from there you will go directly to the dashboard.
If you have successfully logged in the screen will refresh but you will still be on the same page. However there will be one important difference; there should be a black bar across the top of the screen that looks something like the following:

On this bar you should see seven items. From left to right the are:
- WordPress logo – probably not of importance to you at this point
- A speedometer symbol followed by “CCCTS” – this is the dashboard symbol
- “+ New” menu
- “Add Event”
- “View Calendar”
- “How’s it going …” serves to identify the current logged in user
- “Search icon”
To keep things simple we are going to ignore the items on this banner because they are short-cuts to functionality that is available elsewhere. The one exception is the dashboard icon. The dashboard icon is how you switch from the user view to the admin view. So click on the dashboard icon and look at the admin view.
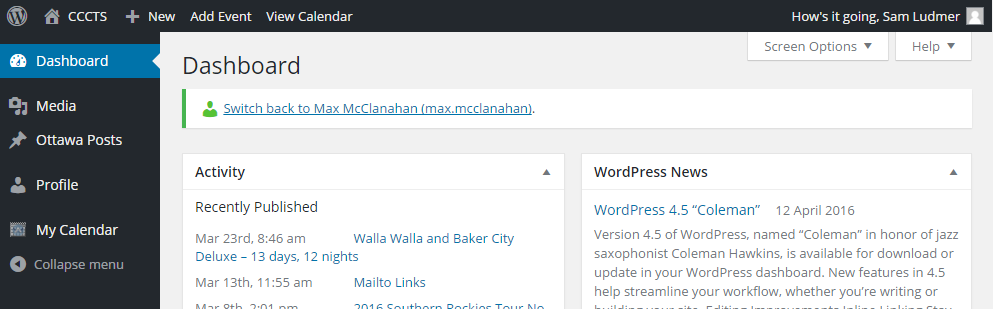
Notice that there are 3 parts to this view. The first part is the upper bar that we saw in the user view previously except that the speedometer icon is replaced with a house icon. We can click on that to take us back to the user view. The important stuff is in the ribbon along the left hand side in particular “Ottawa Posts” and “My Calendar”. When you select an item from the left-side ribbon the details of that operation will be displayed on the right side of the screen.
Ok. It is time to actually doing something!
Creating an Event
If we want to schedule a ride, arrange a club picnic or anything else that involves adding an entry to a calendar this is done by creating an event. First hover on the My Calendar item from the left-side ribbon then select the Add New Event item.

The Add Event Screen – shown below – has several different fields. The first field is Title. In this case I have entered the destination of the ride – Fitzroy Harbor. Next is the Description field. Here you have a full WYSIWYG editor to enter relevant details about the ride. I like to start off by using the bulleted list to enter the specific items like leaders, start point and distance followed by a paragraph for any other text. Note that “Richard Tobin” and “Mike Hui” are hyperlinks. These are created by:
- high lighting the name
- clicking on the
 icon in toolbar.
 - entering the text “mailto:” followed by the email address in the pop-up box
- click on the
 icon in the pop-up box to complete the operation
The next field is Category. This is very important. We have a number of calendars on our site: registrations, tours, and one for each of the local groups. The contents of this field determine which calendar your event will show up on. So for example if you want it to show up on the Ottawa calendar you need to select “Ottawa” from the drop down list. If you neglect to enter anything in this field then it will default to the “General” category and it will not show up on any calendar. So if you enter an event but it doesn’t show up on your calendar, the first thing to check is that you have the category right.
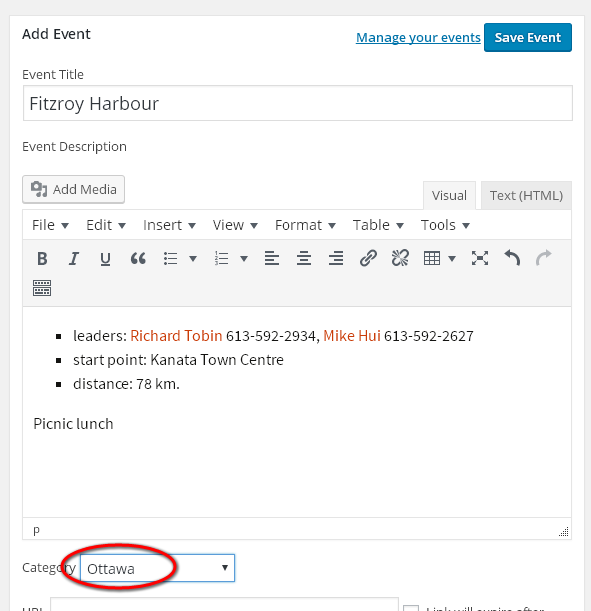
The final field that you need to populate on this page is Date and Time. Obviously if you are going to put something on the calendar you need to provide a date and time (or at least date). Click in the date box and a calendar widget will pop-up so that you can select the date. Next click on the From box and a pop-up will appear so that you can select your start time. For most of our events we don’t have a specific end time so we leave the To box blank and we check Hide end time. For a single day event you will want to leave the End Date box empty as well.

For simple events you can safely ignore the Recurring and Event Location fields. That’s it. Click on the ![]() button at the bottom of the screen and you are done.
button at the bottom of the screen and you are done.
Creating a Post
Writing a post is even easier than creating an event. To start go to the admin view.

Hover on Ottawa Posts then select Add New. This will display the New Ottawa Post screen, as show Below. Enter the title for the post. Here I have entered “Ride Leaders needed”. For the body of the post you have the same WYSIWYG editor that you used before to enter an event description.

When you are done entering your text and doing any formatting that you want always remember to check your work before posting to the site. You will notice in the right hand column of the display a box labeled “Publish”. Click on the ![]() button to see what your post will look like when it is published. In most cases you browser will open a new tab to show you what your page will look like if published. When you are happy with your post select the
button to see what your post will look like when it is published. In most cases you browser will open a new tab to show you what your page will look like if published. When you are happy with your post select the ![]() button to save your work and display your post in the “News” section of your local site.
button to save your work and display your post in the “News” section of your local site.
Adding an Image to your post
Once you are comfortable writing simple text posts you may want to include a photo in your post. There are a number of ways to do this in WordPress, but the most straightforward is just to drag and drop.
First place your cursor in the location where you want the image to be located. Then grab the image that you want to insert and drag to your editor screen. You will see a drag target which will quickly be replaced by a screen similar to the following.
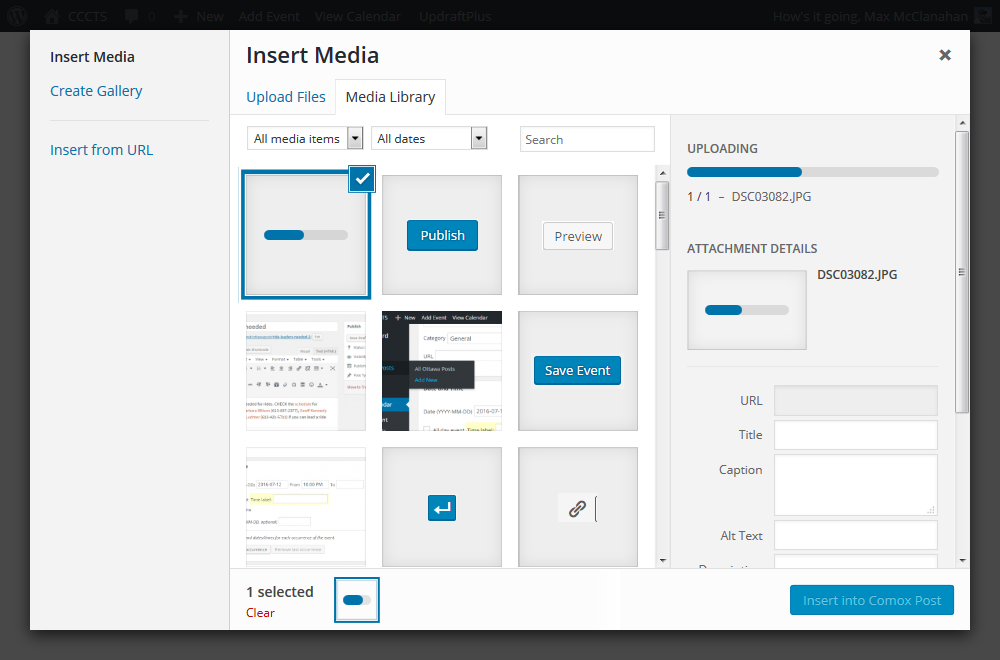
This is a the upload screen. It will be displayed while the image is being uploaded. Notice the progress bar on the right hand side. When the upload is complete it will be replaced by a screen similar to the following.
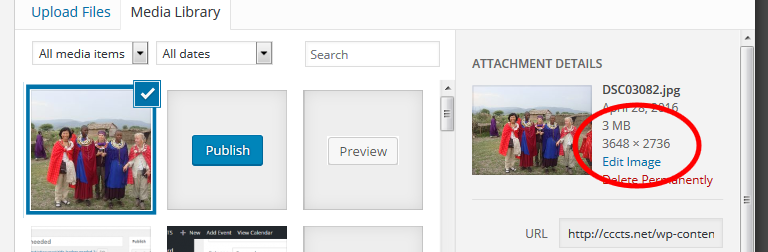
On the left hand side you see a thumbnail of the image that has been uploaded. On the right hand side you see information about the image. In particular notice that this image is 3 MB and that the dimensions are much larger than can be displayed in a web browser. This image is suitable for printing but not for display on a web site. If possible try to scale your images before uploading. They will upload a lot faster.
Insert your image into your post by selecting the Insert into XXX Post button at the bottom right of that screen.
That is it. Click on the Preview Changes to view your post.
