If you are interested in leading a CCCTS Tour or Hub & Spoke and are unsure about how to do that, this is the article for you.
Before we dive into the details of how to write a proposal let’s talk a little bit about how things are structured. There are a number of details that you as ride leader need to pin down before starting a ride. Potential participants also expect to see certain details before they are willing to commit. Over the years the club has developed a template to lay out what information needs to be provided. Recently the club has automated this template into the current form-based approach on the website. There are two purposes for that change. First to capture all of the elements of the ride templates. The second is to automate most of the formatting task for the proposal. Formatting is important. If it is clean and consistent it is easy for the potential participant to find the information they need. In the past those formatting issues could consume a considerable amount of time from the ride leader and director. Under the current approach most of the formatting is done by the system. The ride leader provides the necessary information by filling in form fields and the system generates a nicely formatted proposal suitable for reading by potential participants. The ride leader should also add a map and several photos of the area the tour or Hub & Spoke will visit.

Authorisation to Write a Ride Proposal
Once you have an idea of where you would like to go and when, then the best thing to do first is contact either the Tour Directors or the Hub & Spoke Director. They can help provide guidance on what works and what doesn’t. They can also provide help in finding resources that you will need in developing your proposal. They will also tell you what other rides are on the schedule for the timeframe you are considering.
Once you and the ride director agree that you have a solid idea for a ride, it is time to turn it into a proposal. Your ride director will create the skeleton trip proposal for you on the club website. They will also make you the author of the proposal so you have full permission to write the proposal. Once they have done that, you are all ready to go.
Preparing to Write your Proposal
There is a standard “template” for writing your tour or Hub & Spoke (H&S) proposal. Contact the Tour or H&S Director and they will send you the template. There are standard things that will need to be included in the proposal and these are described below. The proposal should be prepared following the CCCTS standard template in a file separate from the website. After the Board approves the tour/H&S, then the leader and the Director will work together to enter the ride to the website.
- Leader. This is your name. When the proposal is populated to the website, the Leader filed is a drop-down box containing the name of the ride leader. Only the ride Director should make an entry to this field. You should not change this field. If you do you may not be able to edit your proposal any longer. If it does not contain your name, contact your ride director to correct it. If you would like to change the way your name is displayed (e.g. you want to go by “Jim” not “James”) then you can change your Profile to set the Display Name field to display your name the way you would like it.
- Leader Email. This is your email address and is a required field.
- Leader Phone. Your phone number.
- Co-Leader. If you have a co-leader or multiple co-leaders, enter their name(s) here.
- Co-Leader Email. The email address of your co-leader.
- Co-leader Phone. Your co-leaders phone number.
- Tour Contractor. If you are co-coordinating a trip that is being run through a tour contractor (e.g. Spice Roads or Sitnica) then enter the name of the tour contractor. You can enter additional information such as email, website or phone in this field if you wish. Of course, leave the field blank if you are not using a tour contractor.
- Start Date. The date when your tour begins. When entering the tour to the website, click anywhere in the field and a calendar widget will pop-up to help you enter your date in the correct format. This is a required field. If you haven’t decided on a date yet, use January 1st.
- End Date. The last day of your trip. Also a required field.
- Ride Classification. Please refer to the ride ratings page to determine what the appropriate rating is for this ride. If you are in doubt what is appropriate here, discuss the issue with your ride director.
- Ride Fee. This is the total cost of the ride. When entering the ride to the website, this is a currency field so you will only be able to enter a dollar amount — no additional text. If the tour fees will be paid directly to a tour operator, the amount shown in this entry field will only show the amount of the Registration Fee ($100 usually). In this case, the Tour Fees should be clearly and boldly displayed as part of the Ride Description field below. This amount should be in Canadian dollars (CAD) unless otherwise stated. If you are using an alternate currency , a payment schedule or any other information about the fee, that information should be placed in the Registration and Selection field.
- Minimum Riders. The minimum number of riders required to run the trip (including trip leaders). If this number of riders do not register the ride may be cancelled.
- Maximum Riders. The maximum number of rider that the trip can handle (including leaders). Registrants above the maximum will be placed on a wait-list, unless there are so many extra registrants and the leader decides it is possible to organize a second riding group to go on different dates.
- Registration Open. This is the date and time that online registration opens for this ride. The time should always be given in Pacific time to avoid confusion. You may want to work with your ride director to pick a time that does not conflict with other rides.
- Registration Close. If you wish to shut off registration before the the start of the ride, enter that date and time here. If you plan on leaving registration open right up until the ride event goes, leave this field blank. If your ride has reached maximum enrolment it can still remain open and additional registrants will be wait-listed.
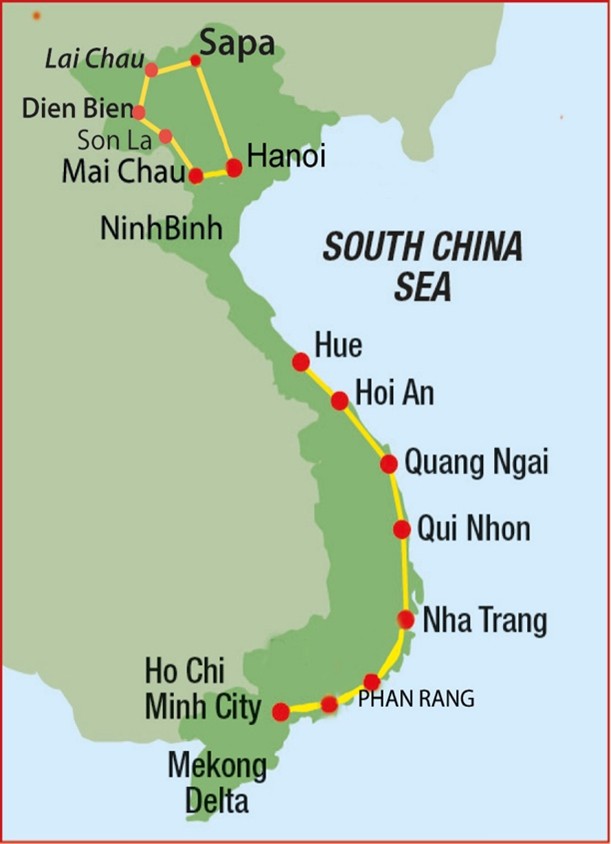
- Ride Description. This is the heart of your proposal. Take as much space as you would like to fully describe your ride. Note that you should try not to repeat information contained in other fields such as Ride Conditions, Itinerary, etc. When entering the proposal to the website, for this field you will use a rich text box to enter your information. That means that you have control over the formatting within this field so that you can use italics here, bold text there. You can insert hyperlinks to external references and you can use numbered and un-numbered lists. You should include photos throughout your proposal and a map of the general ride route.
- Accommodations. Describe the type of accommodations – hotels, camping, level or hotels, etc. Hotel names and links can/should be included in the Itinerary section if they are available. For Hub and Spokes, we usually have fairly extensive accommodations sections. What accommodations are available in the area, contact information for the preferred accommodations, any discount rates that have been arranged, etc.
- Ride Conditions. This a standard section that should be in all ride descriptions. Will this trip be entirely on quite country roads? Are you going to have some days with heavy traffic and narrow shoulders? Maybe you are going to have some time off paved roads — gravel? hardpack? What type of bike is most appropriate for this ride? This is also the place to talk about the weather that should/could be expected during the ride event.
- Fee Includes. Everything that’s included should be listed, including any coverage of tour fees for leaders or a tour driver or other staff, if applicable. Things that are frequently included are accommodations (how many nights), meals (how many breakfasts, lunches, dinners, snacks, other), happy hours, entrance fees for certain attractions or activities, a support vehicle. Basically what are all the things you are providing for the participant’s dollar.
- Fee Does Not Include. Everything that’s not included should be listed. Frequently this includes travel to and from the starting point, rental bikes, alcohol, tips for guides, airport transport, tour leader fees for leaders if these are waived, travel insurance. Don’t make assumptions about what people expect to be provided. If you put it in print up front everyone can be prepared.
- Itinerary. In this section you would provide the details for each day of the trip. Where you are starting and ending each day. How many kilometres you are planning to cover that day and the elevation gain. A numbered list or a table can work well for presenting this kind of detail or a day-by-day list is the most common presentation. Adding photos to this section really helps improve the “marketing” of your ride.
- Registration and Selection. The form provides some boiler plate that you may wish to use for this section. Here is where you tell people how and when to sign up for your trip. This section also needs to address when payments are due and how much for each payment. Include a section on Cancellations and Refunds. This section will vary depending on whether it is a member-led ride or a contractor-led tour. If the latter, include the tour operator’s policies on cancellations and refunds.
- Participants. Don’t worry about this field. It will be updated by the system as registration progresses.
- Wait List. Don’t worry about this field. It will be updated by the system as registration progresses.

Review and Approval of Your Ride Proposal
Once you are done with your Tour/H&S Proposal, you should contact your ride Director to have him/her review the information you have provided. Even if you know you are not done you may want to to request feed-back from you ride Director. If you think you might be going down the wrong path, it is always appropriate to ask for an interim review to avoid wasting time that can be avoided. Generally you will find the ride Directors encouraging and helpful, but generally you need to let them know that you need their help. When you submit your proposal for review your ride Director will get back to you with his/her questions, comments and suggestions. You should anticipate an iterative process toward approving your proposal.
The next step is for your Director to present your proposal to the Board for approval. Generally this will occur via an email exchange. You may need to answer some questions about your ride proposal or make changes to it based on the Board’s review. Once it is approved by the Board, the tour/H&S will be Published (see below) on the club website and advertised to the club members via an all club email the ride Director will send out.
Entering Your Ride Proposal to the Website and Publishing
After your ride proposal is fully approved, it’s time to put it on the website and Publish it for the club members to see. Your ride Director will set up the skeleton of your ride on the website and put it in Draft mode. It’s important to leave it in Draft mode until the Director is ready to Publish the ride. Whenever you make changes to your ride event in the website, make sure to hit the ‘Save Changes’ button or the ‘Update’ button for Published rides before you exit the screen. Otherwise, you will lose all of your changes.
In order to enter your ride event information, log into the CCCTS website. Then, log into the Dashboard section of the website – click on the icon that looks like a speedometer in the upper left corner of the screen to get there. Once you successfully log into the Dashboard, you should see something like the following:
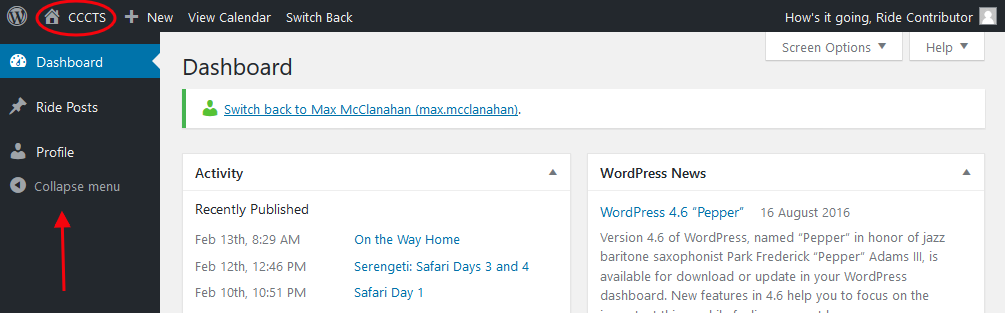
This screen is called the “Dashboard”. It is one of 2 views of the website. You are probably more familiar with the user view of the site. Now that you have logged into the site there is a black ribbon across the top of the screen. On the left end of the ribbon there is a picture of house and the words “CCCTS”. If you click on this you will be taken user view. In the user view the house icon will be replaced by a speedometer icon. Clicking on that will bring you back to the dashboard.
Along the left hand side of the screen you will see a black sidebar. This sidebar contains links to the things that you can do in the dashboard. Everyone’s sidebar will different depending on what they can do on the site. As a ride leader you will only see two links: “Ride Posts” and “Profile”. If you click on “Profile” you will be able to do such things as change your password. For now let’s click on “Ride Posts” to show the screen below.
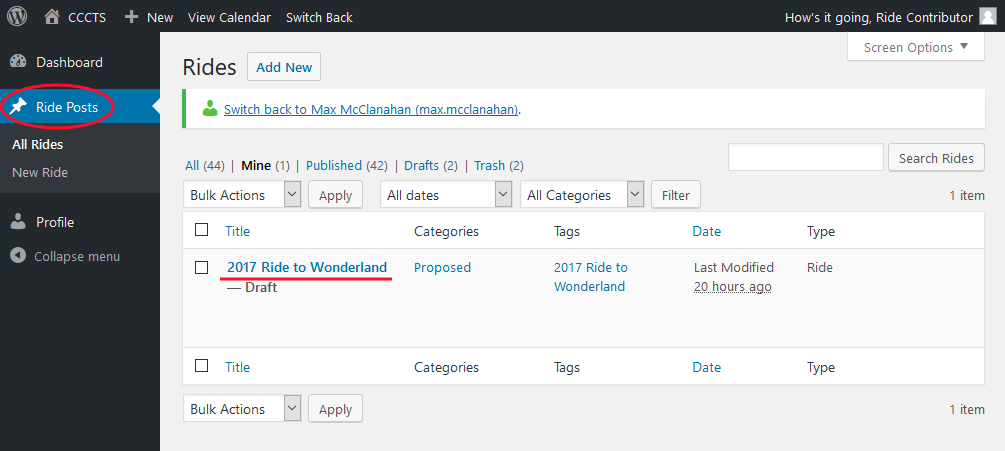
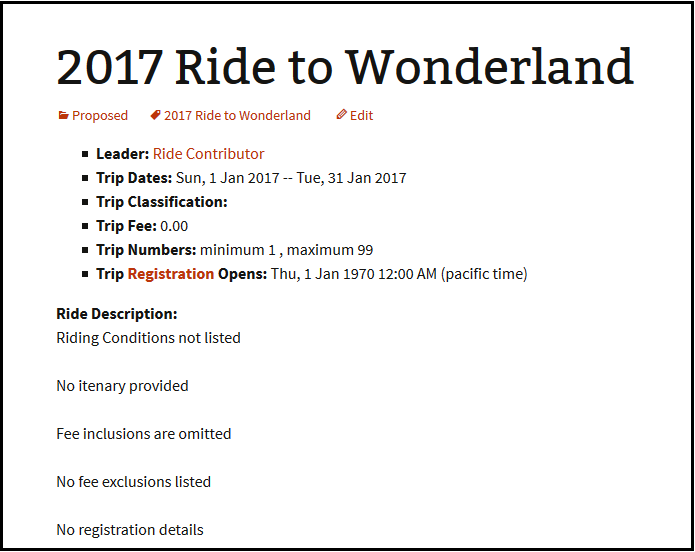
This screen displays the list of rides that belong to you in the main portion of the dashboard. In this case we see only one ride “2017 Ride to Wonderland”. In your case you should see your ride proposal that the ride Director set up for you. If you don’t, you need to ask for help. To edit your ride proposal simply click on the ride title.
 To make it easier to work on your proposal I would suggest making some changes to the default layout of the screen. To do that click on the “Screen Options” tab that you will find in the upper right hand corner of the screen. This will expand the tab. You should adjust your settings to match the image below:

Click on the “Screen Options” tab again to save you settings and you are ready to go.
Saving your Work
The screen now should contain a number of boxes. At the top, of course, is the title box that contains the title of your ride. Below that is the “Publish” box that looks like the image below.
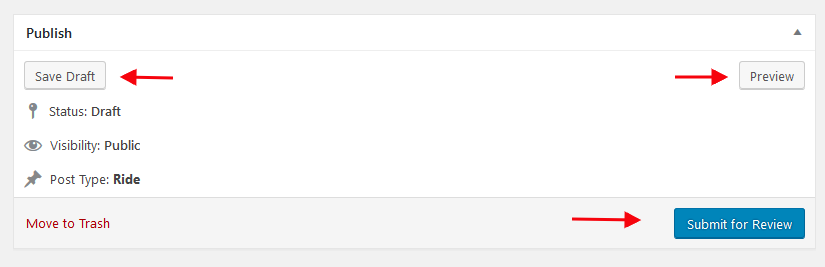
The publish box is how you manage your proposal. The three buttons that it contains are all very important.
- Save Draft: Use this button to save your work. The system will attempt to automatically save your work for you, but it is always a good idea to explicitly do so. Particularly at the end of an editing session save your work before leaving the editor.
- Preview: Use this button to look at the formatted version of your ride proposal. Remember that most of the formatting for your proposal is handled by the system. The formatted version that you see with the preview button will be considerably different than what you see in your editor. Note that the preview will be displayed in a separate tab in your browser.
- Submit for Review: Please do not use this button. We have had leaders who clicked on this button and then lost all of their work after exiting the screen.
Filling in the Fields
Underneath the Publish box there are two more boxes: the More Fields box and the Excerpt box.
The More Fields box contains all of fields that will be used to create your ride proposal. We have described each of these fields above under ‘Preparing to Write Your Proposal.’ We will go through each of the fields and say a little bit about each of them.
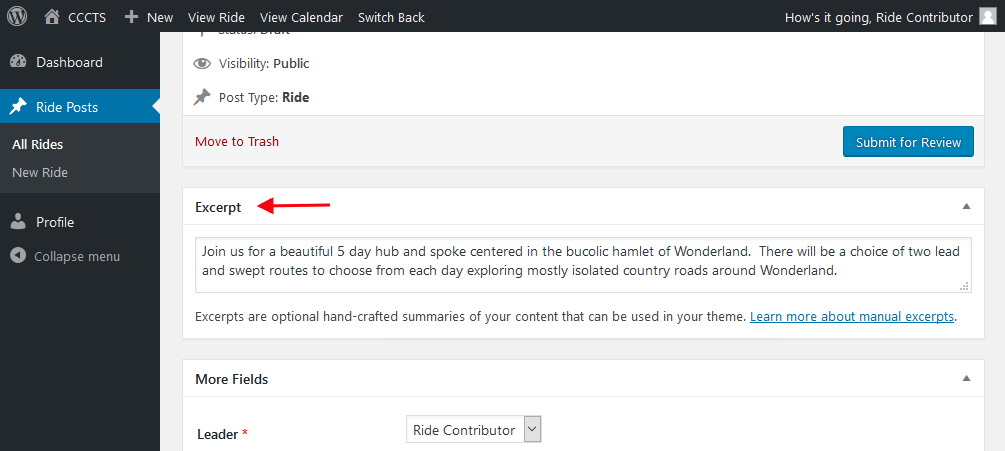
In the Excerpt box you should enter a short description of your ride. One or two sentences is best. The excerpt will not appear as part of your trip proposal, but it will appear as the summary of your ride in all listings along with the ride title. This is your first chance to catch the attention of potential participants.
In order to manage your tour on the club’s website after it’s posted, see the How To post on ‘Ride Administration’.